
Chewy, dense, full of sourdough flavor. A pure Barley Bread that is naturally risen? Impossible, you might say, especially since Barley Flour has virtually no gluten, the main element of flour that helps the bread rise. Well, I’ve found a method that involves using pure Barley Flour that is fermented in order to bring out a delicious sourdough flavor and give the bread a little bit of rise (you essentially end up with a flattened bread). The Barley Flour is not so overwhelming that you lose the sourdough taste, and it is low glycemic, which means that it will not cause a sudden spike in blood sugar levels like most white or whole wheat flours may do.
If you don’t have experience in bread baking, I find this to be relatively simple. The first step is making your sourdough starter. Once you have an active starter going, it’s time to convert it over to a Barley Flour starter.
I tried various methods in converting my white flour starter to a whole grain one, and found the Detmolder Process gave the best results. The process is for Rye Flour, yet Barley Flour may be easily substituted. You need to make sure that you have an open schedule during the Detmolder Process, since there are specific times in which you add more flour and water to the starter. You do not need to be precise on your ferment stages, but do not wait longer than one hour before adding the flour and water, or you will start to get a rancid starter.
I got a lot of help with my Sourdough bread making strategy from Sourdough Home, including the ratios of Starter/Flour/Water used in this recipe. This is an amazing web site, so if you have a particular interest in Sourdough bread making, I highly recommend you spend your time browsing this very informative website.
*This recipe will make 4 small loaves of Barley Sourdough bread. They may be frozen for up to three months.*
Day One
6:00 am-“Freshening”

I recommend you start as early as possible. Even starting at 6:00 am, the bread usually isn’t done until around 9:00 or 10:00 the next evening.
Mix:
1/2 tsp. Starter
1 Tb. Water
4 tsp. Barley Flour
Set in a warm place and let ferment for 6 hours.
12:00 pm- “Basic Sour”

To the previous mixture, add:
1/2 c. + 1 Tb. Water
1 c. + 1 Tb. Barley Flour
Mix well, and return to the warm place for 24 hours.
Day Two
12:00 pm-“Full Sour”

To the previous mixture, add:
1 1/3 c. Water
2 1/2 c. + 1 Tb. Barley Flour
Mix well, and return to the warm place to ferment for 5 hours.
You now have your fermented Barley Flour Starter that is ready to use. Do not refrigerate the starter, or ferment longer than mentioned, or it will become rancid and not have any active yeast.
The Barley Bread Sourdough Recipe:
Ingredients
All of the active Barley Flour Starter from above
1 3/4 c. Water
3 Tb. Butter, softened and broken into small pieces
5 c. Barley Flour
2 3/4 tsp. Salt
4 Tb. Honey
Method
It is strongly suggested to use a stand mixer for this bread (i.e. KitchenAid), since this is a very sticky dough. If you do not have access to one, you may attempt to use a sturdy bowl and a wooden spoon.
In a mixer:
Add all ingredients to the mixer bowl. Knead for 5 minutes.
Turn off and let rest for 5 minutes. This will allow the liquid to be fully absorbed into the flour.
Scrape the sides of the bowl. Knead for 5 minutes more.
Scrape the dough into a large oiled glass bowl for rising.
Cover and let the dough rest for 30 minutes (you will not see much rise since Barley Flour has such a small amount of gluten).
Using wet hands (this is the best way to keep the dough from sticking to your fingers), remove 1/4 of the dough from the bowl.
On a greased and floured cookie sheet, loosely shape into a loaf.

Repeat with the remaining 3/4 of the dough until you have 4 small loaves. Lightly dust the loaves with flour and cover loosely.
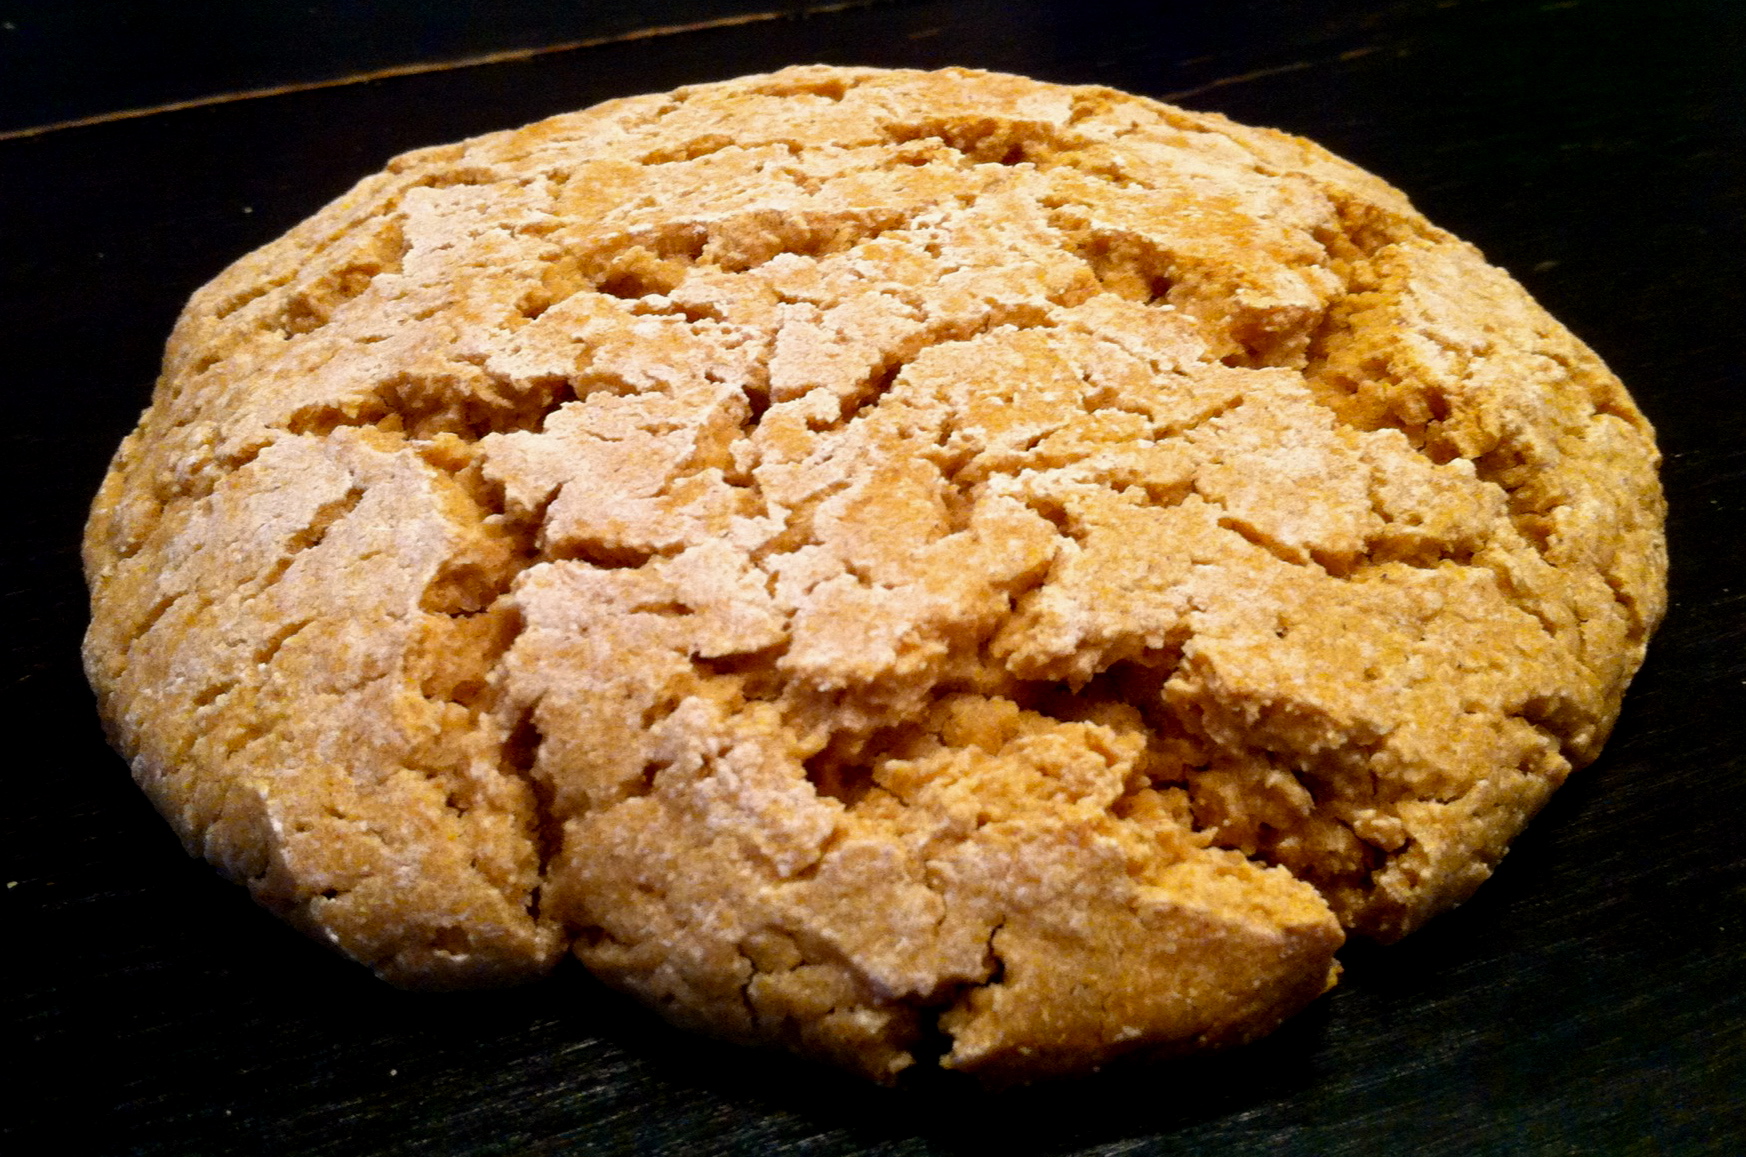
Let the dough rest for approximately 1 1/2 hours. Again, there will be little rise. You will, however, notice that the dough has a “cracked” appearance. This means it is ready for baking.

Place an empty pan on the bottom rack of the oven and preheat to 450 degrees.
When preheated, place the bread in the oven and pour 1 c. water into the empty pan to achieve a “steamy” environment.
Bake 10 minutes, then reduce heat to 350 degrees.
Bake for approximately 30 minutes longer.
Let cool, then tear off a hunk and dip in your favorite dipping oil!


Leave a Reply